Anodized Surface Treatment Case Study

In the consumer electronics industry, product enclosures must not only look great but also be durable and functional. Recently, we helped a client manufacture a consumer electronics enclosure, guiding them through every step from design submission to selecting the best surface treatment. This case highlights how anodized as a surface treatment impacted the appearance, durability, and cost of the final product while showcasing the differences between anodizing and other treatments.
1. Anodizing Overview
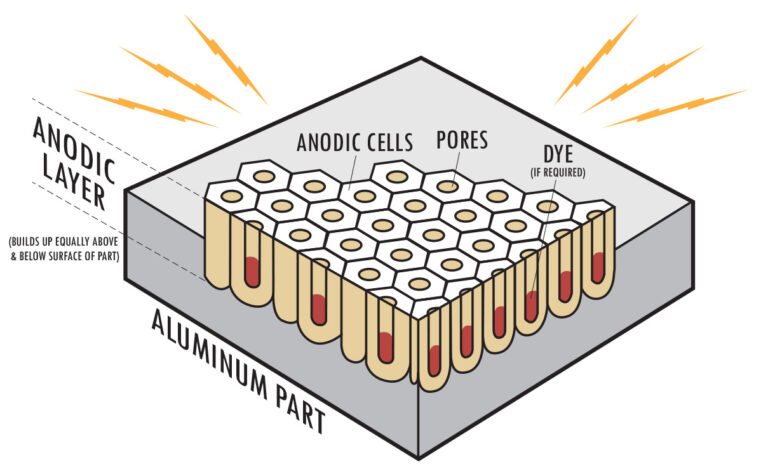
This is a surface treatment method used in manufacturing to enhance the corrosion resistance and surface strength of non-ferrous metal parts and products. The anodizing process utilizes electrolysis to create an oxide layer on the substrate.
You might wonder how this differs from electroplating. In electroplating, a secondary material is deposited onto the surface of the substrate—for example, zinc coating on aluminum. In contrast, anodizing does not apply any additional material as a coating. Instead, it forms an anodized layer directly on the metal’s surface. In this process, the part being anodized acts as the anode.
The thickness of the anodized layer typically ranges from 0.5 to 150 µm. However, due to further oxidation, the layer can grow over time, especially in humid or harsh environmental conditions. The exact thickness also depends on the specific type of anodizing being applied.
| Oxide thickness | Usage |
|---|---|
| 5 microns | Aesthetics only |
| 10 microns | For indoors |
| 15 microns | For outdoors |
| 20 microns | Smog and aggressive atmospheres |
| 25 microns | Architectural structures |
2. How is anodizing performed?
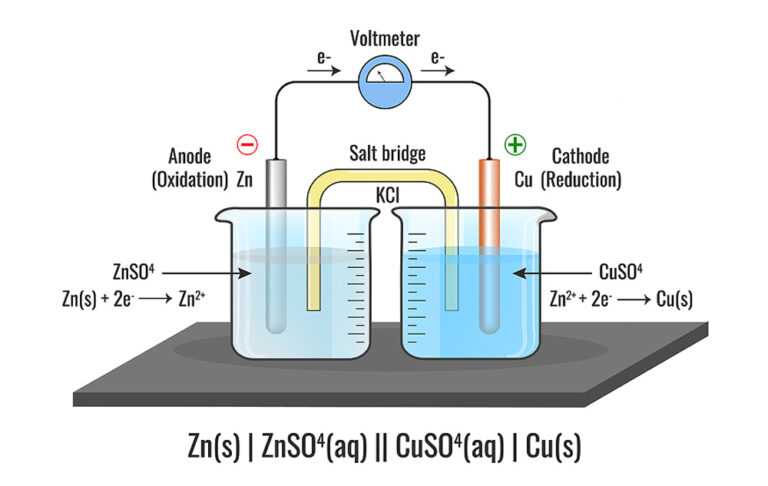
Anodizing is accomplished through an electrochemical process. In this process, the metal (anode) serves as the positive electrode, while a cathode (usually made of lead or stainless steel) is connected to the negative terminal of a power source. The electrolyte, typically sulfuric acid, acts as the medium for the electrochemical reaction.
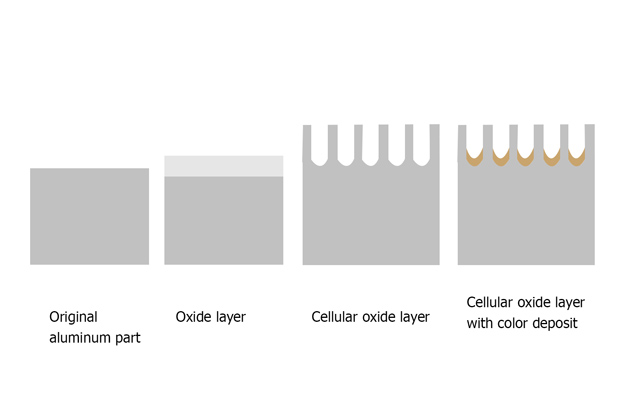
When electric current passes through the electrolyte, oxygen ions are released at the surface of the anode. These ions combine with the metal to form a layer of metal oxide, primarily aluminum oxide (Al2O3). This oxide layer becomes an integral part of the metal, enhancing hardness, wear resistance, and corrosion resistance.
Here is a step-by-step explanation of how anodizing works:
Step 1: Preparation
The metal object (typically aluminum) is thoroughly cleaned to remove dirt, oils, or contaminants from its surface. This ensures proper adhesion of the oxide layer.
Step 2: Anodizing Bath
The metal object is immersed in an electrolyte solution, usually sulfuric acid. This solution acts as the electrolyte and facilitates the flow of current.
Step 3: Electrical Setup
The metal object serves as the anode (positive electrode) in the circuit, and a cathode (negative electrode) is also placed in the electrolyte. Both electrodes are connected to a DC power source.
Step 4: Oxidation
As electric current passes through the electrolyte, oxygen ions are released at the surface of the anode (metal object). These ions react with the metal, typically aluminum, forming aluminum oxide (Al2O3). The oxide layer grows on the metal’s surface and thickens over time.
Oxidation Reaction:
The metal (M) undergoes oxidation as follows:
M→M3++3e−M \rightarrow M^{3+} + 3e^{-}
Next, the metal ions (M³⁺) react with oxygen ions (O²⁻) that migrate towards the positively charged anode from the dissociation of the electrolyte. These oxygen ions combine with the metal ions at the anode, forming a solid layer of metal oxide on the surface of the metal.
Metal Oxide Formation:
2M3++3O2−→M2O3(s, metal oxide)2M^{3+} + 3O^{2-} \rightarrow M_2O_3 \text{(s, metal oxide)}
Step 5: Anodic Film Formation
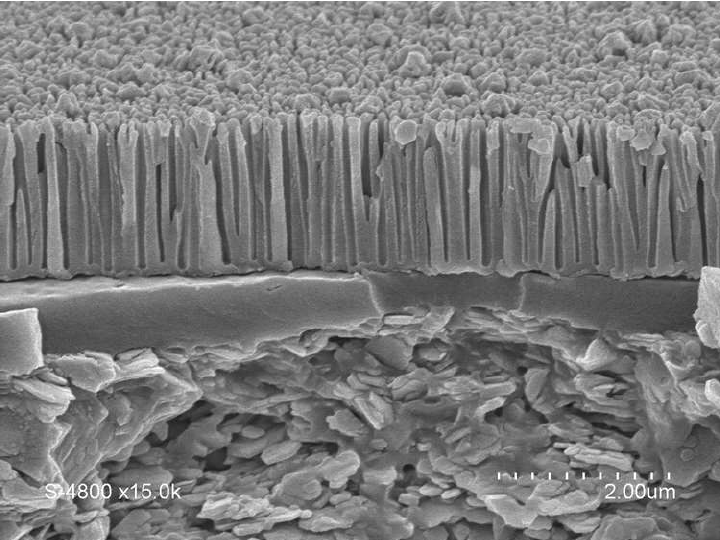
The aluminum oxide layer formed during anodizing is porous, allowing it to absorb dyes or pigments if coloring is desired. This step is optional and is usually applied for decorative purposes.
Step 6: Sealing
Once the desired anodized layer thickness is achieved, the metal object is removed from the electrolyte. To enhance the durability and corrosion resistance of the oxide layer, it undergoes a sealing process. This involves treating the surface with hot water or chemicals to close the pores in the oxide layer, making it more resistant to external factors.
3. Types of anodizing
Anodizing can be classified into three main types, each tailored to different application needs. These types vary in terms of thickness, appearance, durability, and typical usage. Here are the three primary types of anodizing:
1. Type I – Chromic Acid Anodizing
- Electrolyte: Chromic acid solution
- Oxide Layer Thickness: 0.5 – 3 µm
- Characteristics:
- Produces a very thin oxide layer, primarily used for parts where high precision and dimensional stability are crucial.
- Offers moderate corrosion resistance and has minimal impact on the mechanical properties of the metal substrate.
- Applications: Commonly used in aerospace components, particularly for parts that require high fatigue strength.
2. Type II – Sulfuric Acid Anodizing
- Electrolyte: Sulfuric acid solution
- Oxide Layer Thickness: 5 – 25 µm
- Characteristics:
- This is the most common type of anodizing, creating a thicker oxide layer than Type I.
- Provides good corrosion resistance and allows for the absorption of dyes, making it suitable for aesthetic purposes and color finishing.
- Applications: Widely used for consumer electronics, automotive parts, and architectural elements.
3. Type III – Hard Anodizing (Hardcoat)
- Electrolyte: Sulfuric acid solution at lower temperatures
- Oxide Layer Thickness: 25 – 150 µm
- Characteristics:
- Known for producing a much thicker and denser oxide layer, this type offers enhanced durability, wear resistance, and excellent corrosion protection.
- The oxide layer is hard enough to be used in applications that require abrasion resistance.
- Applications: Typically used for industrial machinery, military equipment, and parts exposed to extreme conditions where strength and longevity are critical.
 Type I, Type II, and Type III refer to different classifications of anodizing processes based on their characteristics and performance. Here is a breakdown of the differences between these types:
| Type | Electrolyte | Voltage | Oxide Layer Thickness |
|---|---|---|---|
| Type 1 | Chromic Acid | Low | 0.5 to 5 μm |
| Type 2 | Sulfuric Acid | Medium | 2.5 to 25 μm |
| Type 3 | Sulfuric Acid | High | 25 to 106 μm |
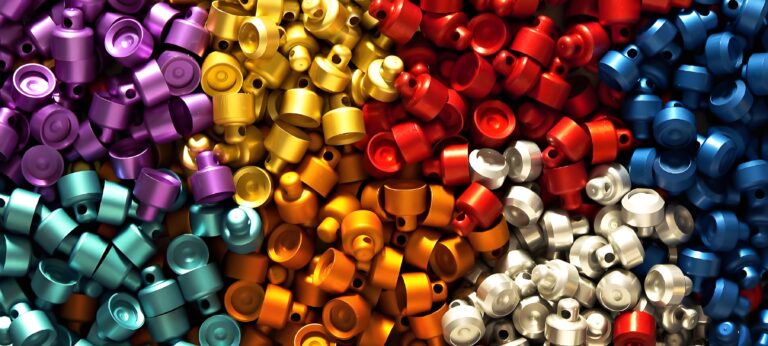
4. Standard Anodizing Color Options
Anodizing allows for a variety of color options and finishes. The anodized layer can be dyed in different colors or left in its natural hue, offering aesthetic flexibility for design, and decorative applications. Anodized metal also provides a visually appealing, smooth, and uniform surface finish. At Leanplans, we offer a range of standard colors for your project. If you require a specific RAL or Pantone color, feel free to contact your sales engineer or reach out to us at service@leanplans.com for personalized assistance.
5.Final Results and Client Feedback
To ensure the accuracy of the treament, our team of senior engineers (with over a decade of experience and involvement in more than 100 complex machining projects) reviewed the AI assessment and provided further expert recommendations.
In this particular case, the client chose a Brushed Gray anodized finish. This option matched their brand’s sleek, modern aesthetic while enhancing the enclosure’s durability. After completing the anodizing process, we conducted strict quality control to ensure each enclosure met the client’s high standards.
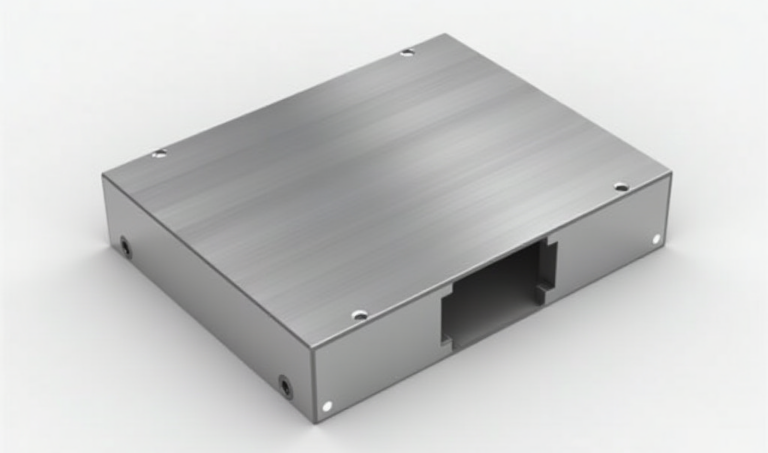
Once the anodized enclosures were complete, the client was highly satisfied with the product’s appearance and quality. The anodized Brushed Gray finish gave the enclosure a premium look, while the increased wear resistance and durability exceeded expectations during performance testing. The anodizing process allowed the client to achieve the desired result while keeping costs under control.
|
Part |
Process Steps |
| Upper and Lower Housing | Sawing -> CNC machining -> Tapping -> Sandblasting -> Anodizing -> Packaging |
| Front Panel | CNC machining -> Chamfering -> Tapping -> Manual Brushed Finish -> Anodizing -> Packaging |
| Custom Aluminum Plate | Laser Cutting -> Manual Brushed Finish -> Anodizing -> Packaging |
| Rear Panel | Laser Cutting -> Chamfering -> Manual Brushed Finish -> Anodizing -> Packaging |
At Leanplans, we don’t just manufacture parts—we’re a full-service partner. Whether you’re facing design challenges or unsure which surface treatment is best for your product, our team of senior engineers is always available to provide expert advice. Simply upload your design to our platform, and we’ll offer tailored surface treatment solutions based on our AI evaluation and human expertise to help you optimize both the performance and appearance of your product.
Get a Free Surface Treatment Assessment and Free Quote!
Leave your contact details, or directly visit our online quoting platform to experience the future of surface treatment selection and production. Get expert surfacce treatment evaluations, tailored DFM analysis, and fast 24-hour production turnaround.
- Free Quote: Upload your designs, and our AI-powered engine will generate a custom quote in seconds.
- Talk to an Expert: Connect with one of our engineers via WhatsApp for immediate assistance.

